Tuesday, October 4, 2011

Hello all,

I have now moved my blog over to Tumblr now :) All of my previous posts will be on Tumblr so you can still enjoy reading... here is the link to my new Tumblr blog!!!

http://bakingforeverybody.tumblr.com/

Thanks

Saturday, September 24, 2011

The Chocolate Leaves!!

So, its another one of my cousins annual parties. That year, I wanted to do something really unique and different; something that I had not tried before. I came up with the idea of doing chocolate leaves?!?!?!? AMBITIOUS right! I know. Well, I got the idea when I was in my garden picking the oranges. I saw the leaves particularly the shape and size of them. I thought to my self, GENIUS. I picked a few leaves and washed them nicely as I was feeding people. So, I first spread a little oil so the chocolate would not stick to the leaves. Then, I melted chocolate and paint brushed on so it one would apply cleanly and two it would give a nice texture to the chocolate. I put them in the freezer for a quick harden and when I peeled the leaves off the chocolate was really nicely textured and looked like a leave but, it was edible!!

For the frosting I believe it was regular homemade butter cream on butter cake all from scratch. YUM!!


       Thanks for reading!

Sunday, September 18, 2011

The Yum Plum Tart!!!

So, I made a delicious plum tart for a dinner we had at out house. I had made a plum crisp really similar too this but this one had a crust where as the crisp only has a topping. I went to the farmers market and found the most crisp plums ever and I tell you they were to die for! But anyway... I cut them into slices about 1/2 and inch think and put some sugar to tame the tartness down. I let the plums soak for about 2-3 hours so they got nice and sweet! For the crust, I made a regular tart dough, the flour, cold butter... Since I did not have a tart pan I used a spring- form pan instead and also pre-baked the crust since it was really hot that day and the butter was getting soft in the dough. After about 10 to 15 minutes of pre-baking I put the plum mixture in the pan and put some granola topping for a little crunch and flavor. The recipe stated that use half of the dough for the pan and half for top, but I ended up using all of the dough and ended up adding granola on the top.

 These are the cut up plums soaking in the sugar! yum!!

This is the crust in the spring-form pan ready to get pre-baked 


This is my little Cuisinart machine!! LOL

 This is the final product!! yum squared
 This is a close up image


Ingredients

Directions

Preheat the oven to 400 degrees F.
Combine the flour, walnuts, and sugar in a large bowl. Add the butter and the egg yolk. Mix, either by hand or with an electric mixer, until crumbly.
Press 1 1/2 cups of the crumb mixture in an even layer into the bottom of a 9 1/2-inch springform or tart pan. Arrange the plums in the pan, skin side down, to form a flower pattern; begin at the outside and work your way in.
Sprinkle the rest of the crumb mixture evenly over the plums. Bake the tart for 40 to 50 minutes, or until it's lightly browned and the plum juices are bubbling. Remove from the oven and cool for 10 minutes. Remove from the pan and transfer the tart to a flat plate. Serve warm or at room temperature.

The recipe does not say to pre-bake or put granola but I just added my own touch :)!!

I got this recipe from Food Network and the chef is Ina Garten. 

Thanks, and sorry for not posting so often

Monday, September 5, 2011

Another Successful Cupcake Order!!!!!!

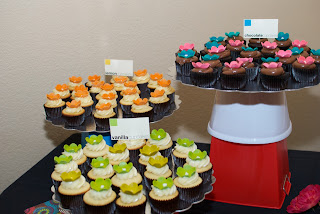
Over the weekend, I made cupcakes for my moms friends 50th birthday. When she came over to try them she called me her "little baker" which I was extremely thrilled about. The color scheme of her party was teal, limey dark green??, fuchsia, brown, and orange. So, the flowers she wanted were the teal, lime green, fuchsia, and orange. She also wanted my signature 3 flavors chocolate, vanilla, and lemon as those were the only 3 flavors I offered her.

Like in the TV cake shows they HAVE to show the process and the drama when they are delivering the cake. The same thing happened to me as I had to go from Palo Alto to Morgan Hill for this event. The car had to be cold like at 60 degrees with the AC on full blast so the icing would't slide off and we had to be extra careful so they wouldn't slide around. My brother was video taping the whole drama from my moms iphone which sadly lasted for 30 seconds.

As last time the vanilla and lemon cupcakes were dry :( I tried a new recipe which came out so much better and will defiantly be a keeper for future orders. 

So, I finally got the pictures off of my brother's computer and here they are. My brother made these lovely name cards for then cupcakes to give them a little pazaaz!

                                                          These are all of the cupcakes!


                                                               These are the lemon ones!
                                                                     The chocolates!

                                         She wanted a 50 made out of the minis so here is the 50

Thanks


Tuesday, August 30, 2011

Questions

 As per request I just wanted to let you know please feel to email me about baking in general. My email address is swimpro98@gmail.com

Friday, August 19, 2011

The Eggless Red Velvet Cake

Sorry for not posting in a while but, I have cousins who don't eat egg. Every year the task comes to me to bake the birthday cake and that is my gift to them :). This year is they wanted red velvet cake and HAD to be egg-less. I thought that red velvet cake was just a mere chocolate cake with less chocolate and more red food color. But not knowing I found an egg-less chocolate cake recipe thinking that my idea would work of the less chocolate and more red food color. When the red color got added  the chocolate and the red color didn't seem as rich as it is in the REAL red velvet cake. What I realized is since you use cake flour in a real red velvet cake the different type of flour saturates the red color in a different way than regular all purpose flour would.  Luckily the final product was good so I didn't mind too much.

The cake design that I made was inspired by the cake that The Cake Girls. It had fondant circles in the pattern which shingles are placed. And then there was a layer of cream cheese  frosting on the top. To give my cake some color I put (fresh) raspberries.


The batter with the red food color added!


The final cake!:)


Thursday, August 4, 2011

The Infamous Ways of a Banana?!?!?!?!?

Ever since I was young I used to make banana fritters with my dad. These are not the ones you fry in a heaping vat of oil made with pancake mix. These originated originally from my dad. He and I used to make these when  my brother and I were young. He used to serve it with some whipped cream and now I have taken this to the next level.

What you will need
  • 1 Banana (sliced into 4's)( Try to use the freshest bananas or else they will turn out soggy)
  • 2 tsp unsalted butter
Directions
  1. Turn the heat to about medium high
  2. Put the butter into a medium sized frying pan and let it heat up nicely
  3. Wait for about 30 seconds to a minute for the butter to heat up 
  4. Place the bananas into the frying pan carefully because they will sizzle
  5. Keep flipping bananas on each side for about 2-3 minutes until desired browness is shown
  6. Enjoy your banana fritters with a scoop of vanilla ice cream or even whipped cream. You can put almost anything!!!
Now what you see here are the ones taken to the next level. I have just gotten in to plating desserts and I made these with caramel sauce (highly recommended) which you can find the recipe for online.


This is the sugar water mixture boiling 


This is the final product!!! The caramel


These are the bananas


This is the halfway done pleated dessert!


Voila! The final product. There are the banana fritters!
  

Tuesday, August 2, 2011

Chocolate Cake!!

I decided to make a chocolate cake for one of my cousins annual Christmas parties. I had made this cake many times in the past for engagement cakes and for other parties but this time is was different because I got a different brand for the cocoa. Earlier I was using the cocoa from Trader Joes's and thought it was the best of all (really). Then I came across a cocoa powder at Costco called Rodelle Dark Cocoa Powder. The name sounded really high quality so I gave it a shot.  It came in a 24 oz can for only 4 bucks. The one I used to get from Trader Joe's was 9 oz for 3 bucks which I thought was a great deal till I saw the Costco one... I tried this cocoa in this cake. When the cake came out out of the oven it was a rich, dark chocolate brown color and when I tried a piece it was really choclatey and yummy!!!! I gave this cake a little twist by adding some Kahlua ((coffee liquer) coffee enhances the flavour of chocolate)  to the batter and some triple sec (orange liqueur) to give a little umph. For decorations I just got some fresh rasberries(always try to use fresh where ever you can) and some mandarin oraanges. I also zested and orange.
With the really delicious cake I made the chocolate ganache to complement the already chocolaty cake.Out mankind I realized when the recipe says use good cocoa actully use it because it makes a big difference in flavor and quality!!

Thursday, July 28, 2011

The Birthday Party and First order

   So my neighbor came over to my house and asked me if I could make cupcakes for her daughter's first birthday party. I said OK not knowing what it would take to make 200 cupcakes (100 regular and 100 mini). And yes 200 was a daunting number for me since this was my first time actually making so many cupcakes. The most I had ever made was a dozen or two, so from 12 to 200 is a big change. We came up with the flavors- chocolate, vanilla, and lemon with lemon curd filling.

   I was really enthusiastic and baked all of the 100 (plus the other 100 minis) all a day before, thinking that my work load would get less. Little did I know that the vanillas would dry out :(
 
   So on the day of the party, which was at 11:00 pm BTW,  I got up at 5 AM to re-bake the vanillas. They turned out great - moist and fresh like they should be. Luckily I had made the 3 frostings ( vanilla, rich chocolate, and lemon) the day before, so that worked out to my benefit. I also started to make the hand made sugar flowers 3 days before so they would have time to dry. Then I steamed them to give them a shine (I got the technique from Cake Boss, the TV show on TLC) and then dusted them with petal dust which was a hefty amount out of my pocket. But it all turned out for the better.